There’s something truly special about enchiladas that brings a sense of warmth and comfort, evoking cherished memories of family gatherings and communal meals. These Creamy Coconut Chickpea Enchiladas take that familiar dish and infuse it with a delightful twist that not only celebrates plant-based cooking but also packs a punch of rich taste and creamy goodness. As I prepared this dish in my cozy kitchen, the aromatic spices melding with the coconut milk filled the air and created an atmosphere of homey bliss. Whether you’re a seasoned vegan or simply looking to incorporate more plant-based meals into your weeknight rotation, this recipe is sure to impress.
Why You’ll Love This Dish
Why should you make these enchiladas? For starters, they’re a vibrant fusion of flavors that nestles perfectly into comfort food territory, all while being entirely plant-based. These enchiladas are quick to whip up, making them an ideal choice for those bustling weeknights when dinner sneaks up on you. Plus, they’re budget-friendly and incredibly filling—chickpeas provide a hearty base while the creamy coconut sauce elevates each bite into pure bliss.
The versatility of this dish is another reason to love it. Not only does it cater to various dietary preferences, but it’s also a hit with kids thanks to its creamy texture and mild spices. And let’s not forget, it has that perfect blend of nutrition and flavor that parents adore.
“I made these for my family last week and they devoured every last bite! The blend of coconut and spices was such a hit with the kids. I’ll definitely be adding this to our regular rotation!”
Step-by-Step Overview
Making Creamy Coconut Chickpea Enchiladas is simpler than you might think, even for a novice cook. This comforting dish comes together in a few straightforward steps, making it a breeze to assemble. Here’s a quick look at how the magic unfolds:
- Prepare your creamy coconut spice sauce.
- Sauté the chickpea and vegetable filling.
- Assemble the enchiladas with your filling and sauce.
- Bake until bubbly and golden.
It’s an inviting process, and before you know it, you’ll have a warm tray of enchiladas ready to grace your dinner table.
What You’ll Need
Gathering your ingredients is half the fun! Here’s what you’ll need for these delightful enchiladas:
Creamy Coconut Spice Sauce:
- 2 tablespoons tomato paste
- 1 1/4 cups full-fat coconut milk
- 1 1/2 teaspoons garam masala
- 1 teaspoon paprika
- 1 teaspoon ground coriander
- 1 teaspoon dried fenugreek leaves or 1/2 teaspoon dried oregano
- 1/4 teaspoon salt
- 1/4 teaspoon garlic powder
Chickpea & Vegetable Filling:
- 1 1/2 teaspoons cooking oil
- 1/2 cup chopped onion
- 1 cup chopped or sliced bell pepper
- 3 ounces sliced mushrooms
- 2 tablespoons ginger-garlic paste or 4 cloves garlic, minced
- 1 inch fresh ginger, minced
- 1 1/2 cups cooked chickpeas, drained and rinsed
- 1/4 teaspoon salt
- 1/4 teaspoon black pepper
- 1 teaspoon fresh lime juice
For Assembling:
- 4 to 6 medium tortillas
- Hot sauce, to taste
- 1 to 1 1/2 cups shredded mozzarella-style cheese (dairy-free or regular)
Optional Garnish:
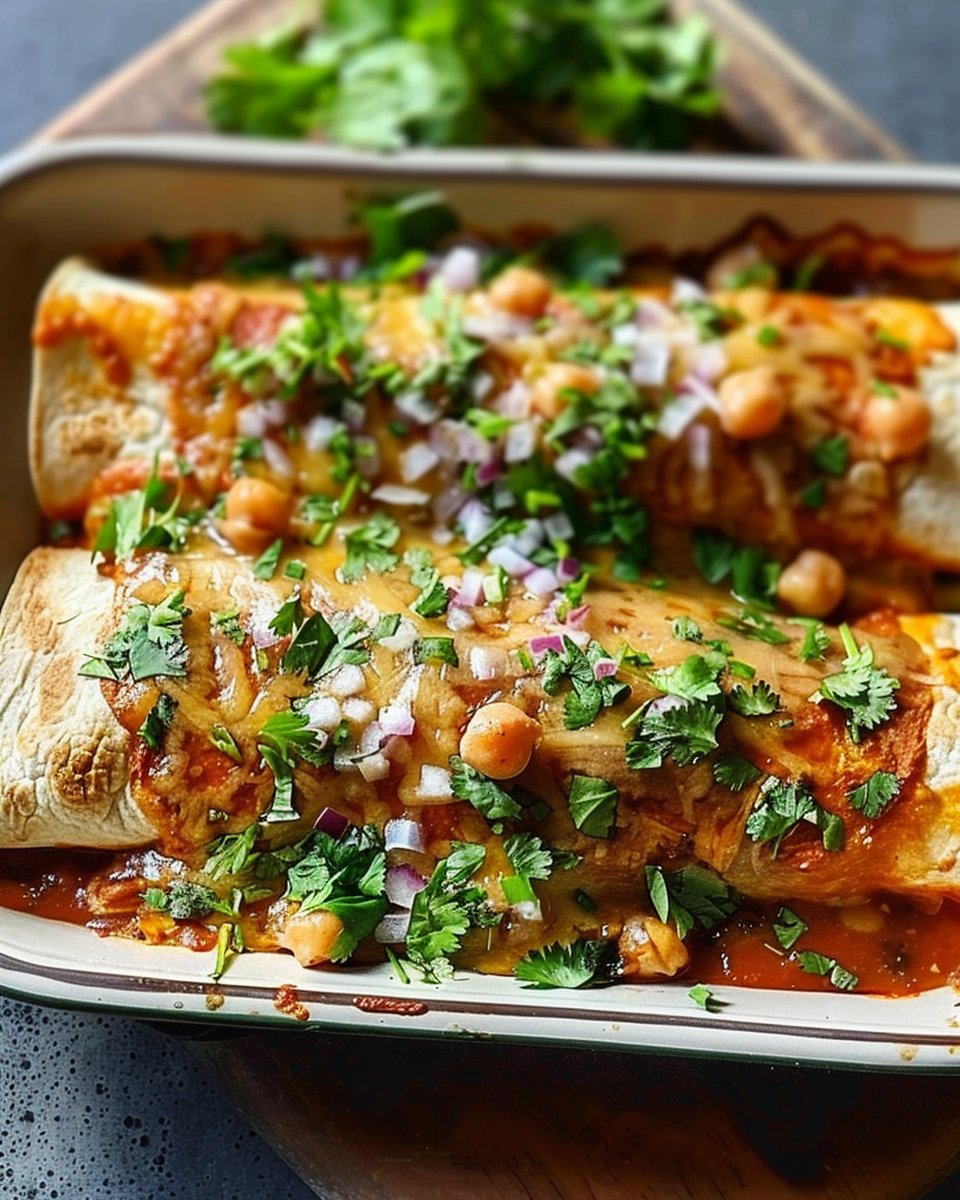
- Chopped red onion
- Fresh cilantro
- Extra hot sauce or lime wedges
These ingredients come together in a symphony of flavors that are sure to connect with your taste buds.
Directions to Follow
Ready to get cooking? Here’s how to create those delectable enchiladas:
- Preheat your oven to 400°F and lightly grease an 8 x 11-inch baking dish.
- In a bowl, whisk together the tomato paste, coconut milk, garam masala, paprika, ground coriander, fenugreek or oregano, salt, and garlic powder. Let that sit for now.
- Heat the cooking oil in a skillet over medium heat. Add the onion, bell pepper, mushrooms, and ginger-garlic paste. Sauté for about 3–4 minutes, until softened.
- Toss in the chickpeas, salt, pepper, and lime juice. Stir in half of your prepared sauce and let it simmer for 5–7 minutes before removing it from the heat.
- If you like it spicy, mix some hot sauce into the remaining coconut sauce and thin with 1–2 tablespoons of water. Spread a third of this sauce over the bottom of your baking dish.
- Fill each tortilla with the chickpea filling, roll them up snugly, and place seam-side down in the dish.
- Pour the remaining sauce over the top and sprinkle with shredded cheese.
- Bake uncovered for 12–15 minutes, or until the sauce is bubbling and the tortillas have a slight golden hue.
- Once out of the oven, allow them to rest for about 5 minutes. Garnish with fresh red onion, cilantro, and those lime wedges to brighten up each plate.
Best Ways to Enjoy It
When it comes to serving these enchiladas, the options are as delicious as the dish itself. I love serving them with a fresh green salad drizzled with a tangy vinaigrette to cut through the creaminess. You could also pair them with lightly sautéed greens or a zesty corn salad for a refreshing contrast. Don’t forget to have extra lime wedges and hot sauce on the side for those who enjoy a little kick.
How to Store & Freeze
If you find yourself with leftovers—though that’s unlikely!—these enchiladas store beautifully. Simply let them cool, then cover tightly with plastic wrap or foil and refrigerate for up to 3 days. To reheat, pop them back in a preheated oven until warmed through, and feel free to add a splash of coconut milk if they’ve dried out a bit.
For longer storage, you can freeze them without the cheese for up to 3 months. Just make sure to thaw them in the fridge overnight before baking again, adding cheese only during the final stages of baking if desired.
Helpful Cooking Tips
- Make sure to drain and rinse your chickpeas thoroughly to avoid any tinny flavor from the can.
- If you’re short on time, feel free to use store-bought ginger-garlic paste—it saves on prep time and still delivers great flavor.
- For a twist in flavor, consider adding some chopped spinach or kale to the chickpea filling for an extra boost of nutrition.
Creative Twists
Variations on this recipe can be fun! For a twist, consider using sweet potatoes or a medley of seasonal vegetables as a filling instead of chickpeas. You could also experiment with different spices—try adding some curry powder or even some smoked paprika for a deeper flavor profile. Switching out the coconut milk for a cashew or nut cream can also give a unique taste and texture, making this dish your own.
Your Questions Answered
How long does it take to make these enchiladas?
From start to finish, including prep time, you can have these enchiladas on the table in about 45 minutes.
Can I make these enchiladas gluten-free?
Absolutely! Just use gluten-free tortillas, and you’re all set.
What can I substitute for chickpeas?
If chickpeas aren’t your thing, you could use black beans, lentils, or even a mix of both for a different flavor and texture.
These Creamy Coconut Chickpea Enchiladas truly encapsulate the essence of comfort food while being simple to make, versatile, and inviting. They’re a heartfelt addition to any mealtime—enjoy the journey of creating and the joy of sharing them with those you love.

Creamy Coconut Chickpea Enchiladas
Ingredients
Method
- Preheat your oven to 400°F and lightly grease an 8 x 11-inch baking dish.
- In a bowl, whisk together the tomato paste, coconut milk, garam masala, paprika, ground coriander, fenugreek or oregano, salt, and garlic powder. Let that sit for now.
- Heat the cooking oil in a skillet over medium heat.
- Add the onion, bell pepper, mushrooms, and ginger-garlic paste. Sauté for about 3–4 minutes, until softened.
- Toss in the chickpeas, salt, pepper, and lime juice. Stir in half of your prepared sauce and let it simmer for 5–7 minutes before removing it from the heat.
- If you like it spicy, mix some hot sauce into the remaining coconut sauce and thin with 1–2 tablespoons of water.
- Spread a third of this sauce over the bottom of your baking dish.
- Fill each tortilla with the chickpea filling, roll them up snugly, and place seam-side down in the dish.
- Pour the remaining sauce over the top and sprinkle with shredded cheese.
- Bake uncovered for 12–15 minutes, or until the sauce is bubbling and the tortillas have a slight golden hue.
- Once out of the oven, allow them to rest for about 5 minutes. Garnish with fresh red onion, cilantro, and those lime wedges to brighten up each plate.